Entering a Non Fuel Invoice Manually
There are two simple ways to get to a new invoice template:
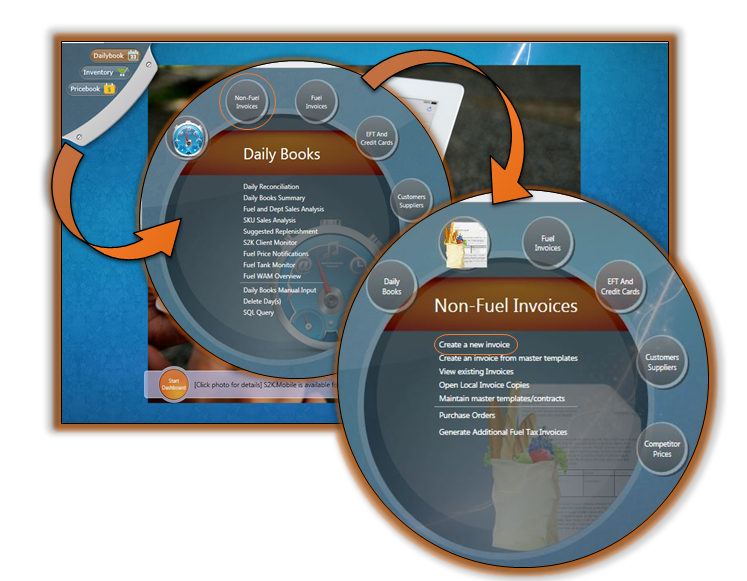
1: Go to the Series2K Home Screen. Click the grey pull down tab in the top left corner of the Home Screen to access the three primary sections: Pricebook, Inventory, and Dailybook (As the first arrow indicates in the picture below).
As indicated in the picture above, click the Daily Books button then click the Non-Fuel Invoices bubble. The available links will change.
Click the “Create a new invoice” link and a Non-Fuel Invoice with a blank invoice header will appear.
2: Go to the Series2K Home Screen. In the Navigation toolbar, under the Quick Launch section, click the “Non-Fuel Invoice” link (pictured below).

When the invoice window opens, click the NEW icon in the toolbar and that will take you to a blank invoice template (pictured below).
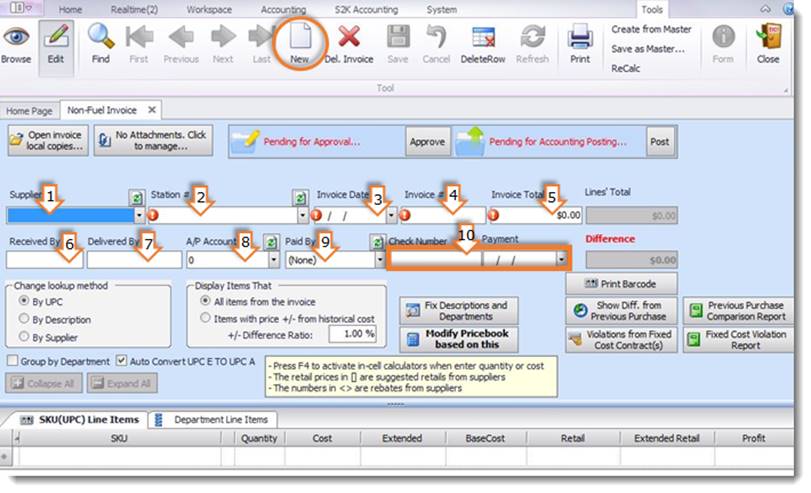
To enter a new invoice fill out the following fields in the invoice header (pictured above):
(** All fields with exclamation
mark ( ) are REQUIRED**)
1.
Choose a supplier
2.
Select the station/store
3.
Choose the date of the invoice
4.
Enter the Invoice #
5.
Enter Invoice Total $
6. Enter Received by (optional for your records)
7. Enter Delivered by (optional for your records)
8. Enter A/P Account (optional for your records)
9. Enter the Paid By criteria
10. If paid by check enter the check #

To begin entering the line items onto your invoice, choose the method by which you would like to look up the items. You do this in the “Change Lookup Method” box located on the bottom right of the invoice header.
By UPC: Enter the SKU number based on your invoice
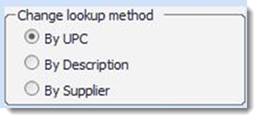
By Description: If you do not know the SKU# you can find items by descriptions in your Price Book
By Supplier: If you have setup suppliers’ special ID # for specific items in your Price Book you can use this feature, but it must be setup first or else it won’t work.

(Pictured above is for manually entering a non-fuel invoice).
Enter the (1) SKU, Description or Supplier # in the first field on the blank invoice, then tab to the (2) Quantity field enter total individual items received in relation the UPC # (i.e.: if the UPC# is for 1pk of cigarettes and you bought a carton with 10pks in it then you’ll enter 10 for Quantity, and enter (3) Cost based upon 1 of the 10pks.
So if you paid $50 for 1 carton of 10pks, then each pack cost you $5, thus in the Cost field you’d enter $5.00. After doing so, the (4) Extended field should display the total cost for that particular item received) There is a calculator in the Quantity field to assist you, click on the arrow to use.
After you’ve entered all of the items into the invoice be sure that the “Difference” at the top is $0 (pictured below). This indicates that your invoice is balanced.
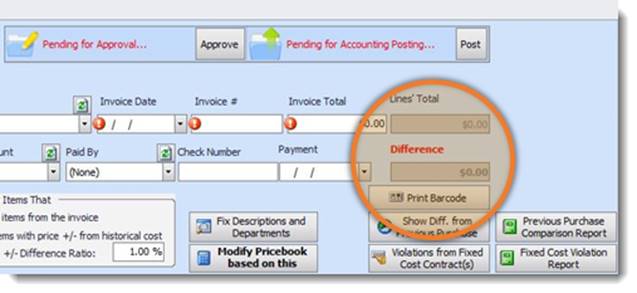
You can also modify retail prices based on the items on the invoice, by clicking on the button “Modify Pricebook Based on this”