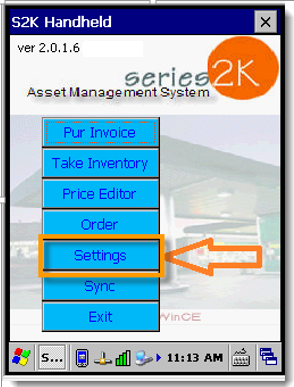
Once you have S2K open on your handheld you will need to adjust the settings for your station. On the S2K Handheld home screen, pictured below, click the settings button.
A settings screen will appear (pictured below).
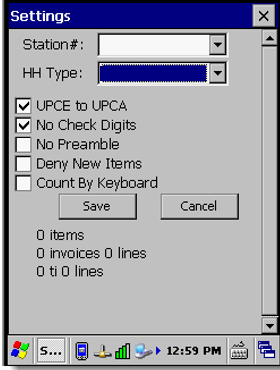
1. Station # - With the settings screen open enter your station # in the field at the top of the screen.
.")
2. HH Type – The type of handheld you’re using will already be programmed for you.
3. UPCE to UPCA - This converts the shorter UPCE barcodes to UPCA automatically. This should always be selected.
4. No Check Digits - This option omits the check digit from barcodes. This is not needed for Tesoro and should NOT be selected.
5. No Preamble - This option will omit the leading digit from a barcode and should NOT be selected.
6. Deny New Items - This will cause the scanner to reject any item that has not already been set-up in the S2K system. This is optional.
7. Count By Keyboard - When enabled, this feature will display a message when the same barcode is scanned more than once. It will ask for a quantity to be manually input. If left unchecked, scanning the same item will just add 1 to the quantity each time it is scanned. This is also optional.
When finished setting up your HH, the Settings screen should look similar to the picture below.
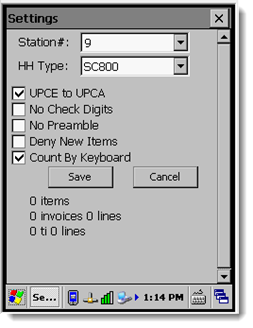
Once you have your HH set-up, click SAVE and you will be directed back to the S2K HH home screen.
*Barcode settings
Barcode settings should be adjusted prior to using the HH.
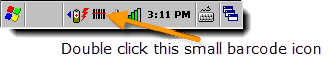
To access these settings, you can either DOUBLE+CLICK the small barcode icon at the bottom of the screen (pictured below).
By default, the settings on the Barcode Control screen should look similar to the first screen pictured below, the most important field to change is the Output Mode, pictured in the second screen below.
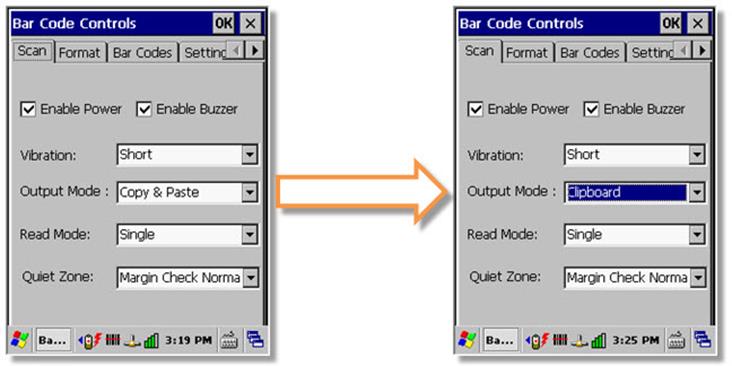
Output Mode – Change from “Copy & Paste” to “Clipboard” option.
Quiet Zone - leave as is.
Vibration and Read Mode – options unique to the user, modify to fit your personal preference.
Read Mode - allows you to scan multiple items by holding down the scan button on the device when “MULTIPLE” is selected. Otherwise, “SINGLE” will only allow one barcode scan when the scan button is pressed.
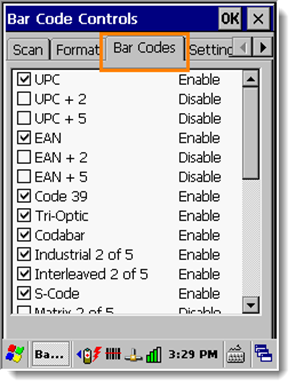
Skip the Format tab, this section is already pre-formatted. Click the Barcode tab, as shown in the picture below. A list of all supported barcodes for this device will be displayed. Default settings here should suffice, but you may check other types of barcodes should you need that feature.
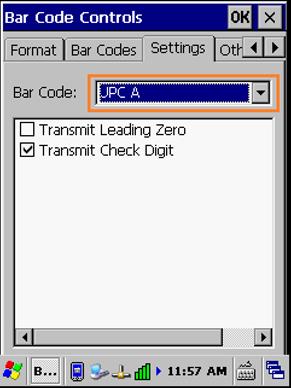
Click the Settings tab to the left of the Bar Codes tab. On this screen, you can cycle through the different barcode formats and adjust them as needed. UPCA, UPCE, and EAN are the most common.
As pictured below, the UPCA barcode option is selected by default. Make sure that ONLY the Transmit Check Digit option is selected as showen listed below the barcode field.
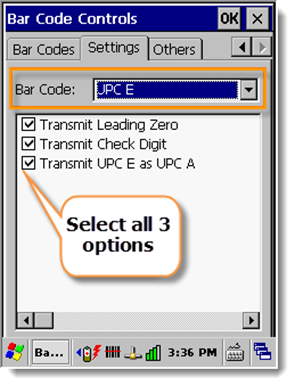
NEXT: In the Bar Code field, select UPCE from the dropdown menu. Select all 3 options listed as shown in the picture below.
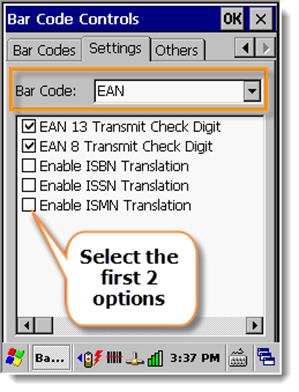
Next: select EAN and check the first 2 options listed. The other 3 are optional and are not typically used but can be if needed (pictured below).
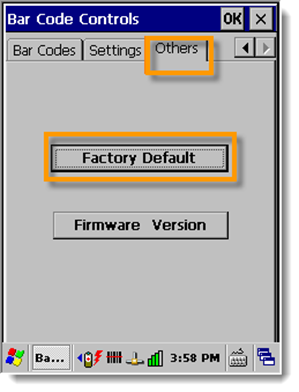
If you find that your barcodes are NOT scanning correctly and you are unable to find the correct settings to fix it in the previous screens in the Bar Code Control panel then, open the next tab titled Others.
In the Others tab you have the option to reset barcode controls to factory default (pictured below). NOTE: This should only be used as a last resort and you MUST go through each tab again to set everything up properly after resetting.
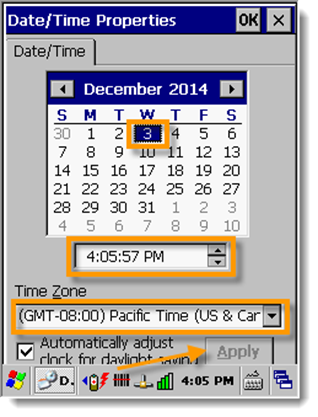
*System Date/Time
Setting the system date and time is critical.
This tells the back office what time and day the information was entered.
You can adjust this by double-clicking the time at the bottom of your handheld screen.

This will open a calendar to select the correct month, day and year (pictured below). Below the calendar you can also set the correct time. Be sure to choose your time zone at the bottom of the screen as well. Once completed, click the Apply button and then OK in the top corner.