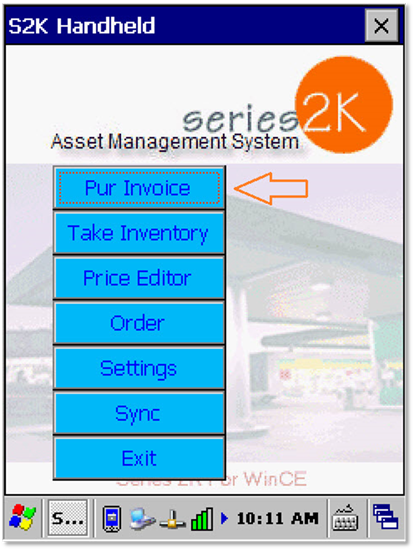
To create a non-fuel invoice, click the button on the main screen that says "Pur Invoice" (pictured below).
This will bring you to a screen that shows all of the existing invoices on the device, or it will be blank if there are none created yet. You will also have 3 options to choose from below. New, Edit, or Delete (pictured below).

To edit an existing invoice from the list: Highlight the invoice by tapping on it one time, then tap the edit button.
To delete an invoice from this list: Highlight it, then tap delete.
To create a new invoice: Tap the new button. An invoice header screen will appear (pictured below).
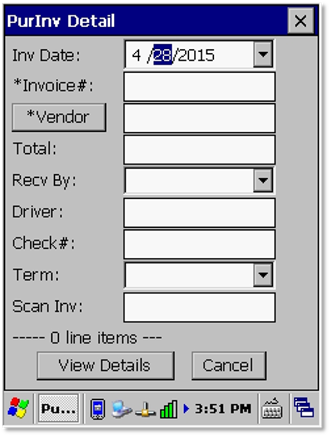
Verify that the date is correct and enter the invoice number.
You will then need to add a vendor. Syncing your device will upload your vendor list to the HH. Select the vendor by tapping the vendor button. This will give you a list to choose from. These are all set up in the S2K back office, do not enter a vendor into the blank field on the HH.
Also in the header window you will want to enter the invoice total.
The remaining fields are optional.
The Recv By field can be used to show who scanned the invoice in. This can be set up in the S2K back office by going to Switchboard, then Employees.
The Driver field is used to specify who made the delivery.
Check # is only used if the field below it (Term) is set to "Check".
Term is the method of payment for the delivery.
Scan Inv is not currently used in the system and can be ignored for now.
When you have all of the required fields entered, tap the View Details button to begin scanning the items.
On this screen, you may begin by scanning the first item. It should populate all of the fields unless the item is new to your pricebook.

After scanning the item and seeing the information populate, adjust the quantity field by using the keypad on the device.
Verify that the cost and retail are correct.
When you finish the first item, you can immediately scan the next item.
If you scan the same item more than one time, a prompt will appear on the screen to add multiple quantities of the same item (pictured below).
Simply add another quantity amount in the field Add Qty, then press Done on the screen to dismiss the prompt. Or you can press the enter button on the handheld, it will update the total quantity and allow you to add more quantity amounts. Tap the Done button or press enter two times to return to the item scan list.

As shown in the screen below, the invoice shows you the UPC of each item scanned into the invoice as well as the Qty of the product, the cost, and the retail. There is an arrow to the left of the UPC number that is displaying in the item details below the list. This provides you with the S2K description and department for the item. Immediately below the item details is a breakdown of what is included in the invoice – # of UPCs listed, # of items, and the total cost of the invoice.
When you finish scanning all of the items for the invoice, click the X in the top right corner to close the invoice. It will save automatically (pictured below).

Now you should see the invoice listed on the screen from before (pictured below). You can edit or delete the invoices here using the buttons displayed below.

Tap the X in the top right corner to close and return to the main screen.
To bring the invoice into S2K, click the Sync button and “download data from the HH.”